Repotting indoor plants is beneficial and fun. In this post, you’ll learn everything there is to know, including how to tell if it needs to be repotted, when and how often to do it, and get tips for choosing the best pots and soil. Then I’ll show you exactly how to repot houseplants step-by-step.


Repotting is beneficial, and an important part of growing houseplants that are healthy and happy. But you should only do it at the right time, and for the right reasons.
If the only reason you want to repot a houseplant is to put it into a prettier planter, or because it’s something you just do every year… well, those are the wrong reasons. These habits can end up causing problems with your houseplants.
But don’t worry. After reading this article, you’ll have all the information that you need in order to feel confident that you’re doing it right, and you’ll know exactly when and how to repot plants.
What Is Repotting?
Repotting, or “potting up”, is simply moving or transplanting a plant from one container to another.
Though most houseplants can live in the same container for several years, they will eventually become root-bound.
What Does Root-bound Mean?
The term “root-bound” (also called “pot-bound”) means that the roots have grown to fill the pot entirely, leaving little of no room for new growth.
When this happens, the soil will no longer be able to hold the moisture and nutrients the plant needs in order to thrive. As a result, its health will start to decline.
Do You Need To Repot Indoor Plants?
Once a houseplant has become pot-bound, then yes, it usually needs to be repotted. However, as I touched on above, most can stay in the same pot for a long time.
In fact, some actually hate to be repotted, and prefer to be pot-bound. So it’s best to only repot indoor plants when they need it, rather than doing it on a set schedule, or for aesthetic purposes.
Why Repot Plants?
Houseplants will benefit from being repotted when they need it. Not only is it fun to put them into cool new containers, but there are lots of benefits of repotting plants too.
Moving plants into a new container gives them more room to grow, refreshes stale soil, replenishes lost nutrients, and triggers healthy new growth. Here are all the benefits…
- Refreshes the soil and nutrients
- Improves water retention and absorption
- Gives the roots more room to grow
- Helps to avoid soil compaction
- Prevents the plant from becoming pot-bound
- Triggers healthy new growth
- Allows the plant to grow larger
How To Tell If A Plant Needs Repotting
It’s usually pretty easy to tell when a plant needs to be repotted. Here are the telltale signs to watch out for…
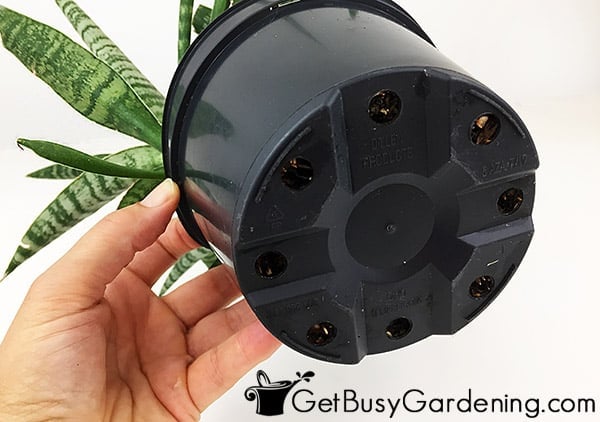
- There are roots are coming out of the drainage holes in the bottom of the pot
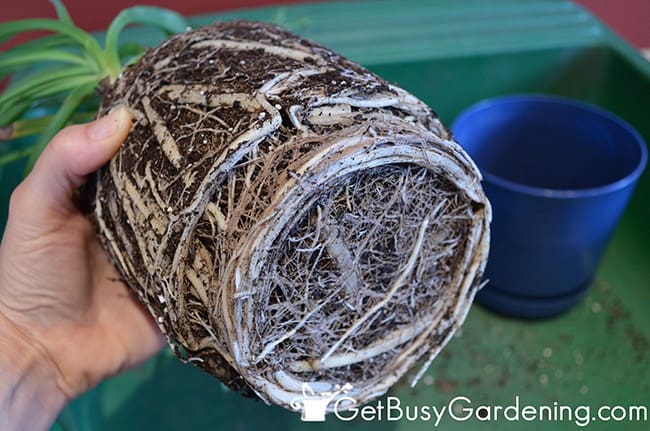
- The roots are growing in a circular pattern inside the container
- Water runs straight through the pot, and very little is absorbed by the soil
- The pot has become deformed, or looks as if it’s ready to bust open
- There are roots growing over top of the soil
- The plant has become top-heavy, and keeps falling over
- You need to water the plant constantly in order to keep it from drooping
- The plant is disproportionately larger than the pot
- The soil is constantly dry, or it won’t hold moisture
- There are more roots in the container than soil
- The plant is growing slower than usual, or has stopped all together
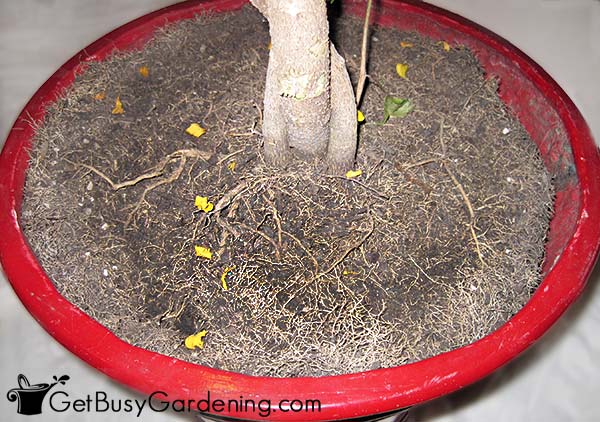
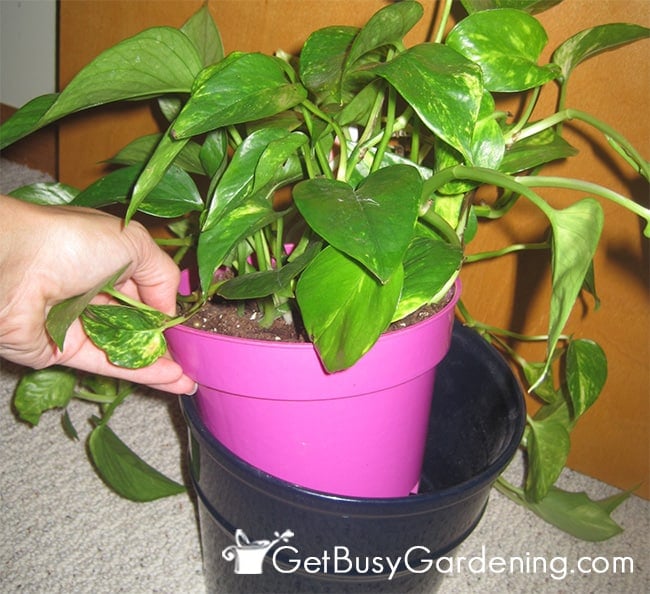
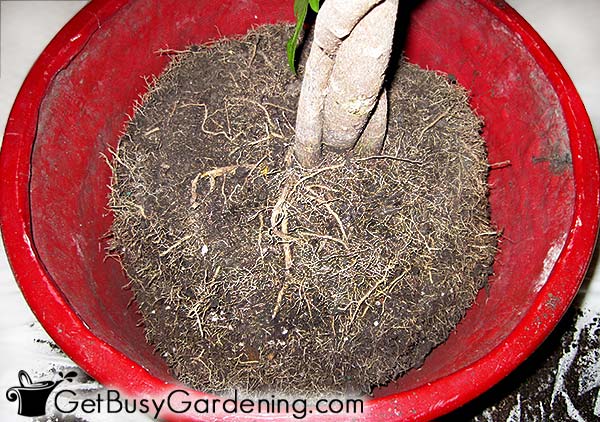
If you’re still unsure that your indoor plant needs repotting, then turn it on its side, and gently slide it out of the pot.
If there’s a dense mass of roots with very little soil left in the pot, or the roots are circling around the inside, that means the it is root-bound.
Also, if it won’t slide out of the pot easily, and seems to be stuck, that’s also another good sign that it is pot-bound.
Related Post: The Best Indoor Houseplant Supplies, Tools & Equipment
Should You Repot New Plants?
No, not right away. For some reason, many people think the first thing they should do with a brand new plant is repot it. But this is a bad habit to get into.
Think of all the stress the poor thing has already been put through.
It went from living in ideal conditions in a greenhouse, to being moved to a garden center (where they don’t always get the best care), to being moved, yet again, to your house.
Whew, the poor thing needs a break!
So next time you bring home a new indoor plant, give it a few weeks to adjust before repotting it.
This will also give you time to learn about the ideal care it needs to thrive, quarantine it for bugs, and monitor it for signs of stress.
If you’re dying to repot your new houseplant because of the ugly nursery pot that it came in, simply hide it by dropping it into a decorative cache pot.
Tips For Repotting Plants
Before repotting any plant, it’s best to do a little research to see how well it will do. Some hate being transplanted, or prefer to be pot-bound.
In fact, some flowering plants won’t set buds until they’re pot-bound.
Here are some tips so know when and how often to repot, as well as the best type of containers and soil to use…
When To Repot Plants
Spring or early summer is the best time of the year to repot indoor plants. Repotting stimulates new growth, which is not what you want to do during the fall and winter months.
But remember, only repot them when they need it. And never repot a plant that is sick or dying, or one that has a bug infestation, or you could kill it.
Repotting indoor plants for purely aesthetic reasons is never a good idea either.
How Often To Repot Plants
Generally speaking, most houseplants don’t need to be repotted very often.
If you put them outside during the summer, they will probably outgrow their planter faster, and will need to be repotted more often.
Many can happily live in the same container for several years without any issues.
So, rather than automatically repotting houseplants on a regular basis, watch for the signs that they actually need it.
Choosing The Best Pot
When repotting houseplants, choose a new container that’s only one size larger than the original.
For example, move it from a 4″ to a 6″ size, but not up to a 10″ size. I also recommend using a pot that has drainage holes, because it helps prevent overwatering.
If you tend to water too much, then use a plain terracotta planter. The clay helps to wick moisture out of the soil so it will dry out faster.
On the flip side, if you forget to water your indoor plants, then use one that’s sealed, glazed, or made out of plastic.
Before reusing a container that had a different plant potted in it, make sure to scrub it with soap and water. This is a crucial step that’s very important for preventing the transfer of any diseases or bugs.
My flower pot bristle brush works perfect for this task (plus it’s cute too!). If you’re using a container that’s made out of clay or hard plastic, you can put it on the top shelf of your dishwasher to disinfect it.
How To Keep Soil From Falling Out Of The Pot
Some people don’t like using pots with drainage holes because they worry the soil will fall out and make a mess. Well, there’s a super easy fix for that!
To keep the soil in, while still allowing the water to drain out, cover the holes in the pot with drainage netting, or use a piece of screen material or landscape fabric.

Best Soil For Repotting Houseplants
You can use a general purpose potting soil for most indoor plants. But keep in mind that some may require a different type of mix, or a special growing medium.
For example, orchids require an orchid potting mix, and succulents prefer a quick-draining sandy potting mix.
If you’re unsure of what to use, it’s best to look up the specific potting medium recommended for your houseplant.
Always use a fresh, sterile potting mix when repotting houseplants. If there’s any dirt left in the old pot, it’s fine to dump that into the new planter. But don’t reuse soil from one indoor plant to another.
Also, your indoor plant will grow best in a good quality potting mix rather than cheap dirt, so don’t cut costs here.
And never, never use garden soil for potting houseplants. Learn how to make DIY houseplant soil here.
How To Repot A Plant Step-By-Step
Once you determine that your houseplant needs to be repotted, it’s a good idea to water it a day or two before you plan to repot it.
This will make it easier to remove it from the pot, and helps to reduce the risk of transplant shock.
Supplies Needed:
- Potting soil
- A new container
- Potting tray (to keep the mess contained)
- Hand trowel or butter knife
- Precision pruners or bonsai shears
- Drainage netting (optional)
Step 1: Prune any roots growing out of the drainage holes – If there are roots growing out of the drainage holes, then trim those off first.
This will make it much easier to remove the plant. Precision pruning snips or bonsai shears work great for trimming roots.
Step 2: Remove the plant from the pot – Gently tease it out of the pot, being careful not to pull on the leaves or stems. Be patient, and don’t force it.
You may need to tap on the side or bottom of the planter to loosen things up.
If the plant is stuck, use a butter knife or hand trowel, and gently run it between the inside of the pot and the rootball to loosen it up.
For extremely pot-bound plants, you might need to cut or break the pot in order to remove it.
Step 3: Trim off any unhealthy roots – Once the plant is out of the container, inspect the roots, and trim off any that are damaged or look unhealthy. Healthy roots are firm, and usually whitish in color.
If the roots have grown in a circular pattern, gently tease them apart and straighten them out. This will break the circular growth pattern, and help to stimulate new growth.

Step 4: Put netting over the drainage holes (optional) – Place drainage mesh or other heavy-duty fabric over the holes in the bottom of the new planter.
This will ensure that the dirt stays in, but the water can still easily drain out.
Step 5: Place the plant into the new pot – Position the plant so that the top of the rootball is at the same level as it was in the old pot.
You may need to add some potting soil into the bottom first in order to make this step easier.
If there were roots growing over the top of the soil before, you can place the rootball slightly deeper in order to completely cover them up.
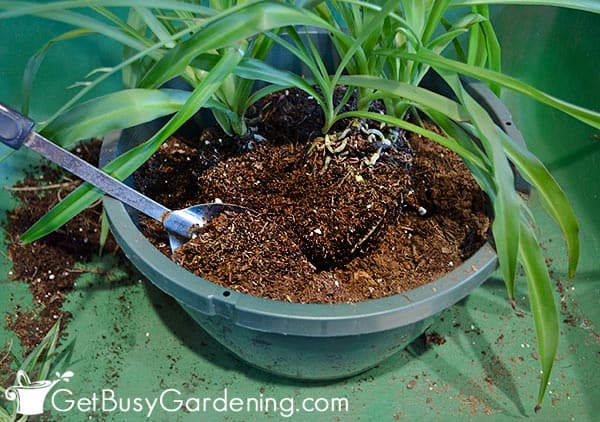
Step 6: Add fresh potting soil – Ensure that your houseplant is centered, and then fill in around the rootball with potting soil.
Lightly pack it down as you work to fill the pot. You don’t need to pack the soil in super tight, just press it down a bit so the rootball is snug.
Step 7: Water the plant – When you’re done repotting an indoor plant, water it to moisten the new soil.
This also helps the soil settle faster. You may need to add more potting mix once everything has settled into the new pot.
Related Post: How To Mount A Staghorn Fern (Platycerium) Step By Step
How To Repot A Large Plant Step-By-Step
If you have a houseplant that is already large, and you can’t move it into a new pot. Or you simply don’t want it to grow any bigger, there is a solution.
You can trim the roots, and repot a large houseplant back into the same container. Trimming the roots will keep the plant from growing bigger, but also allow you to replenish the soil and nutrients.
Supplies Needed:
- Garden knife or sharp kitchen knife
- Potting soil
- Potting tray (to keep the mess contained)
- Precision pruners or bonsai shears
- Drainage netting (optional)
Step 1: Trim off any roots growing out of the bottom of the pot – Use sterile bonsai shears or precision pruners to prune off any roots that are coming out of the drainage holes.
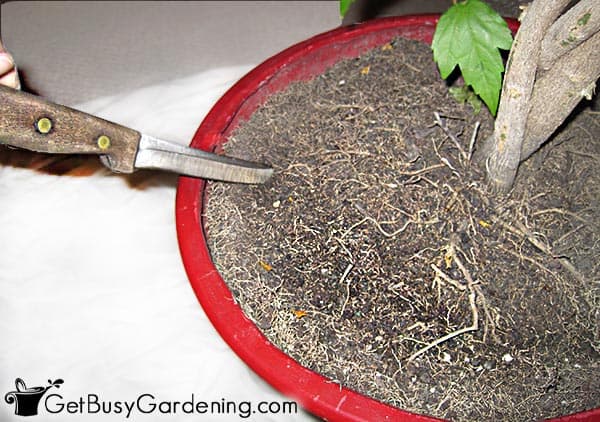
Step 2: Remove the small surface roots – Use a sharp kitchen or garden knife to trim off the small surface roots around the rootball. If it’s easier, you could use the pruners instead of a knife.
Step 3: Remove the plant from the pot (optional) – If you can, pull the plant completely out of the container.
If it’s too much work to lift your large houseplant, then you can just leave it in the pot and skip this step.
Discard any old soil that’s left in the pot if it’s filled with roots. This is also a good time to cover the holes with drainage netting, if there isn’t any in there already.
Then add some fresh potting soil into the bottom before placing the plant back into the pot. Be sure the rootball is at the same depth that it was before.
Step 4: Fill the pot with fresh soil – Ensure the plant is centered in the pot, then fill in around the rootball with fresh potting soil, gently packing it in as you go.
Don’t pack the dirt too tightly, just enough so that the rootball is snug.
Step 5: Water your newly repotted plant – Once you’re done repotting it, give your houseplant a good drink of water to wet the fresh potting soil.
It’s normal for the potting mix to settle after the first few waterings, so be sure to add more as necessary to fill in any gaps or holes.
Transplant Shock After Repotting
It’s important to understand that repotting is very stressful for houseplants. Some can handle being repotted better than others can.
Certain types despise being repotted, and can suffer from severe transplant shock. While others will handle it just fine without any problems.
Some drooping is normal after repotting, and your houseplant should pop back just fine after a day or two.
But keep an eye on newly potted plants to make sure they don’t go into severe transplant shock, which can kill sensitive or weak plants.
Watch out for these telltale signs of transplant shock…
- Severe drooping that lasts more than a few days
- Leaves are uncharacteristically turning yellow or brown
- Leaf and/or bud drop
- The plant looks very sick
If your plant goes into transplant shock, the best thing you can do is leave it alone.
Don’t try to remedy the problem by overwatering, fertilizing, or moving it. And definitely do NOT try to repot it again.
Check the soil, and only water if it’s dried out. Otherwise, leave it alone and allow it to recover.
When To Fertilize A Newly Potted Houseplant
You should never fertilize an indoor plant right after you repot it. It needs time to recover, and feeding it could trigger transplant shock, or make it much worse.
Give your houseplant a couple of weeks to recover before you start fertilizing it again.
Once it has recovered from being repotted, you can start feeding it regularly. Learn about fertilizing houseplants here.
What To Do With Old Potting Soil
When you’re done repotting your plants, the old potting soil can be dumped into the compost bin.
If you don’t have a compost bin, you can just toss it into your garden beds, or throw it in the garbage.
Whatever you do though, never reuse old potting soil to repot other plants. Soil can harbor pests and disease, and reusing it is a recipe for disaster.
FAQs About Repotting Plants
In this section I will answer some of the most commonly asked questions about repotting indoor plants. If you have a question that you can’t find an answer to, please ask it in the comments section below. I’ll be happy to answer it as soon as I can.
Should you water plants after repotting?
Yes… usually. The only time I would not recommend watering a plant after repotting it is if the soil was soggy before you started. Otherwise, giving it a good drink of water after repotting will help to ease the stress, and prevent major transplant shock.
What happens if you don’t repot a plant?
Plants that are severely root-bound will not be able to absorb enough water or nutrients. Some can handle this for a very long time, but others will start dying much faster.
Can you kill a plant by repotting?
YES! This is actually a very common problem with plants that are sick or weak before they’re repotted. Transplant shock can quickly kill a plant that is already stressed. Never repot a dying or ailing plant.
Can root-bound plants recover?
Yes, absolutely. Most root-bound plants will recover very quickly after being potted up into a larger container.
Could you repot plants into the same pot?
Yes. This is common practice for large plants, especially when you don’t want them to grow any bigger. See the section titled “How To Repot A Large Plant” above for details.
Should you ever repot plants into a smaller pot?
It’s not very common practice. But, sometimes a plant is growing in a pot that is too large for it, so it’s better to move it into a smaller one. It’s also common to put plants into smaller pots after dividing them.
Should I put pebbles in my pot?
No, there is no benefit of putting pebbles, stones, rocks, or any other planter filler material into the bottom of the pot. You just need to ensure that the planter has adequate drainage holes.
Can you cut roots when repotting?
Yes, but be careful. Some plants will suffer if you trim the roots too much, or if you cut the tap-root. Others don’t like to have their roots disturbed at all. So, before pruning the roots, be sure to do a little research to make sure your plant isn’t finicky.
Repotting houseplants into bigger pots will stimulate new growth, allowing them to stay healthy, and grow larger. Just be sure you’re doing it at the best time, and for the right reasons. Now that you know the signs for when they need to be repotted, you’ll get it right every time!
If you want to learn all there is to know about maintaining healthy indoor plants, then you need my Houseplant Care eBook. It will show you everything you need to know about how to keep every plant in your home thriving. Download your copy now!
More Houseplant Care Posts
- How To Save A Rotting Cactus Plant
- Spring Houseplant Care Checklist
- How To Grow Amaryllis In Water
- How To Repot A Snake Plant
Share your tips for repotting indoor plants in the comments section below.

Patti Orrico says
I tried to repot a very dark green, leafy hoya plant as it was getting too heavy to even hold up on a trellis.I was surprised to see pretty minimal roots for such a large out-growth. it definitely wasn’t root bound. I stuck it back in a pot with its regular soil as I didn’t have the best soils on hand to really repot it. Now I do and it still seems green and leafy, but I read repotting is the worst thing you can do. I got fast draining soil and !/4″ pumice to give it better soil, but I just don’t want to kill it. it has arms 6′ long and my whole goal was to get it to flower after 10 years……so any advice. Thank you.
Amy Andrychowicz says
As long as your plant is growing well and not pot-bound, there is no reason to repot it. It sounds like it’s very happy to me. 🙂 If it’s too heavy for the pot to stay upright, you can just drop it into a heavier cache pot.
Kelly says
Hi
1 quik ?, is an Aloa Vera plant considered cactus? (I did see sumware on here, that sum 1 had a jiggly plant?, lol, my mom used her aloa to replant me one. The pot is really big, compared to the 3 “hunks” lol ,of aloa, and the dirt is xtremly low. Jiggly. Is that normal (the big pot and low dirt) immediately when i got it, i simply moved it and one huge long chunk flopped out , and all rotted on end.(root end) i put in freezer. So. I put the pot back where it was, a couple weeks went by.
And…it fell. Right on my head , bounced off all over couch. Anyway! Lol. I didn’t kno what to do. I just picked up as much dirt and stuck a couple aloa chunks in dirt..one seems “spotty” …ok. Guess not a quik ? Right! ..my main question was about repotting. But herbs. Basil…every time i replant. They seem stunted. Recently instead of rooted stems. I used a hydro plant. With 4 stems attached to it. In a 4×6 pot. Holes drilled on bottom
So, they come in a rooting plug. I read to just plant that? I did,and it was ok 1st night. By day 3, it was flopped into the dirt
I pulled it out and back into a glass and it came back. Im wondering what i did wrong. ? Also, on your “notes” i noticed you said next to fridge ? I have noticed my basil not good if right next to fridge ,unfortunately my microwave stand is thyr and it’s only place to put them. And ,yea! The stems in plastic gets all condensated right thyr..thyrs soil plants and rooting too..omg..1 more? This happened tonight. Amd it’s 3rd time now. Bought a basil at grocery..ALIVE! get home and open the plastic and immediately EVERY SINGLE LEAVE shrivels up ,looks like a match got put under it. This happened in Sept, still kinda warm out. And tonight. 13° .,my Apt is cold now. But that’s 3 plants. 2 from grocery and 1 from W*lm*rt , so
Ok, long questions…hope you van help ? Thank u!
Amy Andrychowicz says
Aloe vera is a type of succulent plant, and not technically a cactus. I think you’re saying that the “plugs” of those other plants you bought were growing in water before you repotted them into dirt? If that is the case, it is normal for plants to droop after they go from water to soil. It’s quite a shock for them, and can take a long time for them to recover. So, next time you pot them up, give them a few weeks to recover. Don’t pull them out of the soil and put them back into water again. Give them time to get used to being in soil again. Just keep in mind that some plants never recover when they’re moved from water back to soil. Growing in water can be really tough on certain plants. Hopefully this answers your questions. I’m not sure what you’re referring to about growing them next to the fridge.
Ronda says
Great article! Do you trim (or recommend trimming) any roots off the bottom of the root ball when repotting? Say 1/4 of root ball? Thanks
Amy Andrychowicz says
Thank you! Trimming the roots is certainly not required during repotting. But, if they are only small surface roots, then you can trim them pretty safely. However, if you’re talking about a thick tap root, then I wouldn’t cut too much of it off. Definitely prune off any unhealthy parts of the roots though.
Andrew says
Many thanks for the repotting tips! Growing plants on balconies up on the 21st floor can be rather challenging. Now I can try to repot some of my pot bound ones. ? Thanks again!
Amy Andrychowicz says
You’re welcome! Have fun repotting your plants. 🙂
Jackie says
An excellent tip on how to keep your potted plants in good ocndition when they have become pot bound and you do not have the space for them to grow any larger.
Great pictures as well!
Amy Andrychowicz says
Thank you! So glad to hear that you found it useful. 🙂
Julie says
Great info, Amy! Very nice pictures to go along with the instructions for repotting plants too. Thanks for sharing.
Amy Andrychowicz says
You’re welcome, glad you found it helpful! 🙂
Olivia Samples says
Hi, I read your article too late! I had already moved my houseplants into containers about an inch larger and added more soil. One of them seems to be pretty wiggly, but I don’t want to pack it too tight. Any advice on this unstable plant after repotting, and how to care for these that I’ve already moved to new pots?
Amy Andrychowicz says
LOL, we’ve all been there for sure! The only thing you can do is monitor your houseplants to make sure they aren’t suffering after being repotted. Leave them in their spot, and don’t move them until they have recovered (moving them too much can cause further stress to some).
As for the one that’s loose in the pot, you can just leave it for now. The soil will settle in each time you water it. As it settles, you can add more soil to the top if necessary. Otherwise, you could try gently packing the soil down a bit more with your fingers, and adding more to top it off.
Courtenay says
Thanks for this! I’m going to let my new plants de-stress and adjust for longer. I also use the nursery pots to line my decorative pots. It’s great for bottom-watering with a bowl and makes repotting easier (the plastic can be gently squeezed to loosen the plant or even cut & peeled off if stubbornly pot-bound). I’m surprised more gardening blogs don’t recommend keeping the nursery pots for potting up indoor plants.
Amy Andrychowicz says
You’re welcome. I agree about the plastic pots. It makes repotting and watering them so much easier! Plus you can just swap out the cache pot when you change your decor, rather than having to repot all of your plants. LOL!
Vanessa says
Hello, Thanks for this! I wouldn’t have a clue how to repot a plant anyway! My question is do I take the plastic pot the plant is in out of the ceramic pot to water it in the sink? Or can you water it in the ceramic pot? New to plants! Thank you!
Amy Andrychowicz says
You’re welcome! Since you’re new to growing plants, then I would recommend taking the plastic pot out of the ceramic pot to water it over the sink so the extra water can run out. Let it drain completely before putting it back into the ceramic pot. That way, you won’t accidentally overwater your plants.
Vanessa says
Great will do, thank see for the info ?
Amy Andrychowicz says
You bet! ?
Carol says
Good post! I didn’t realize the amount of stress being put on the plant when it’s repotted. Thank you!
Amy Andrychowicz says
Most people don’t realize how stressful repotting is for plants, so don’t feel bad. 🙂 You’re welcome!
June says
Thank you for the steps and info about repotting plants, this was very helpful.
Amy Andrychowicz says
You’re welcome! 🙂
Petite Plants says
Sinningias are houseplants. And very rewarding ones!
I like how small they are. Sometimes the large plants become almost an architectural feature that we tune out.
The little ones, though, can grab your focus, draw you down in to their scale, and give you a kind of a "stop and smell the roses" moment.
(I don't mean to imply they are fragrant – I was speaking figuratively).
Amy Andrychowicz says
Thanks for the info, I will have to add that one to my “want” list! I already have enough large plants, so small is good. 🙂
Petite Plants says
Your picture of the pot-bound plant roots before repotting reminded me of my own experience.
I grow miniature sinningias, which are incredible plants for small spaces. I've grown them for years, and I am absolutely amazed how big their tubers can get.
It is easy to forget that there is at least as much going on below the soil as that which we see above.
Thank you for your timely post!
Amy Andrychowicz says
I know what you mean, it always amazes me how quickly some plants can become root-bound. There are a few that I have to repot pretty much every year. Whew!
I’ve never tried growing sinningias before. Are they houseplants, or are are they better for the garden?