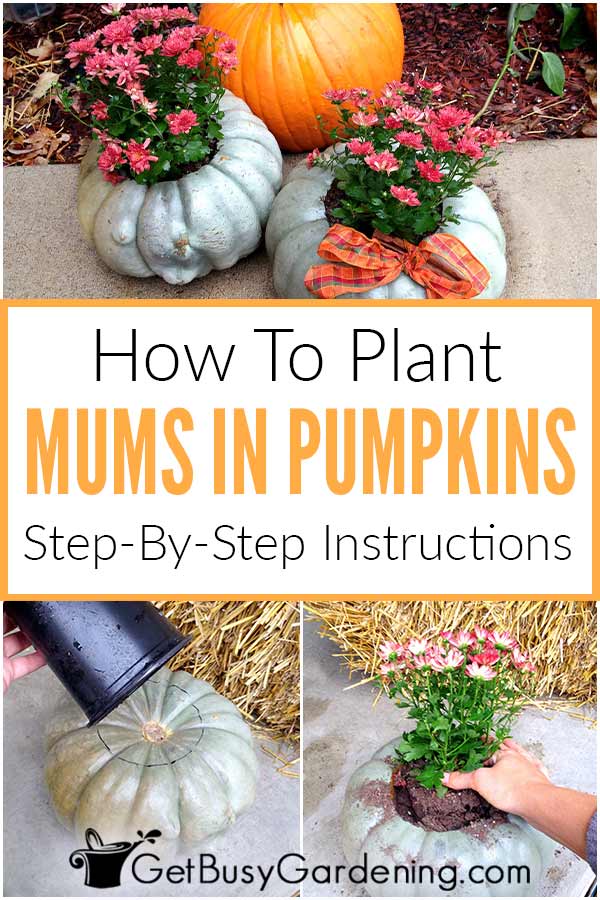
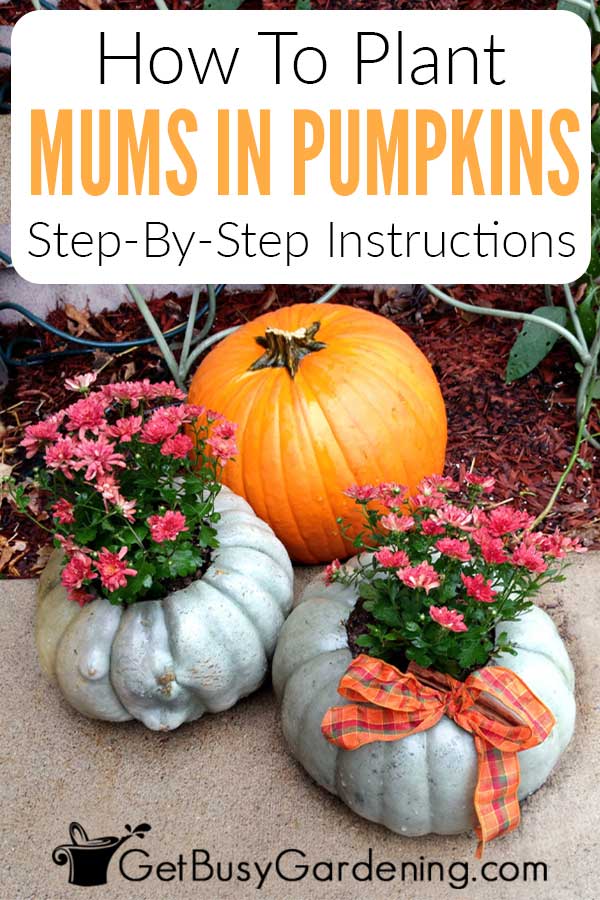
Planting mums in pumpkins is a fun and quick project that will add a unique touch to your fall decor. In this post, I will walk you through how to make these adorable pumpkin planters for mums, step by step.


If you like decorating your home for the fall season, mums planted in pumpkins is a great addition to your display.
It’s an easy and fun idea for fall decorating, and it’s an inexpensive project too (especially if you grow pumpkins and mums in your garden).
Turning a pumpkin into a super cute planter for bright chrysanthemums is a unique way to bring the vibrance of your garden into the colder months.
Decorate your porch and yard, or bring them inside to use as centerpieces for your Halloween and Thanksgiving parties.
You can even give them to friends and family! A pumpkin filled with mums makes a great hostess gift with that extra personal touch.
Tips For Choosing Your Mums & Pumpkins Combo
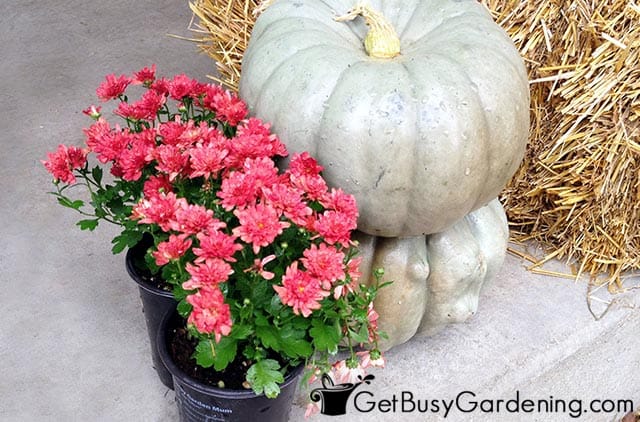
You can use a pumpkin and mum from your garden or the store, that part doesn’t matter. Any variety and combination will work great.
Select a combo that looks nice together, or one that matches your fall decor. Heck, you could even use gourds instead of pumpkins to make your planters even more interesting.
Just be sure to pair ones that are proportionate in size to each other. Planting a huge mum in a small pumpkin – or vice versa – won’t work well, or look good.
Other than that, there are no rules for this project. So get creative, and have fun with it.
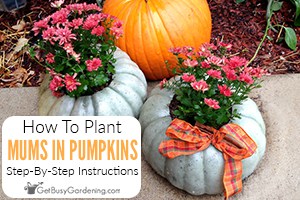
I really liked these cool looking gray pumpkins I found at the farmers market. They look fantastic combined with the dark red flowers of the mums I chose.
Related Post: How To Freeze Pumpkin Chunks Or Puree
How To Plant Mums In Pumpkins
The best part about this project is that it is very inexpensive, especially if you have pumpkins and mums in your garden. Plus, you just need a few basic household items to make it.
Supplies Needed
Here’s what you’ll need to make one pumpkin mum planter.
- A mum plant of your choosing
- A pumpkin or gourd that’s large enough to hold the mum
- Sharp knife
- Large spoon (optional)
- Sharpie marker
- General potting soil
- Disposable gloves (optional)
- Fall colors ribbon (optional)
Step By Step Instructions
This quick and easy project takes about 15 minutes to complete. If you want to do a couple of pumpkin mum planters at a time, it’ll be even faster to make each one. Here are the steps…
Step 1: Select your pumpkin and mum combo – There aren’t many rules to follow here, you can let your creativity run wild. Choose colors that clash, or ones that compliment each other, it’s totally up to you!
But, do make sure your mums and pumpkins are proportionate in size. If one is much larger or smaller than the other, it won’t look very good.
Step 2: Remove the mum from its pot – Gently remove the plant from the container it came in. You’ll need the pot for the next step, but set the mum aside for now.
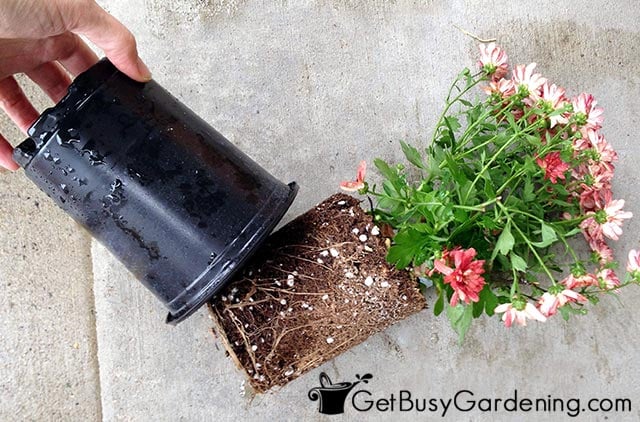
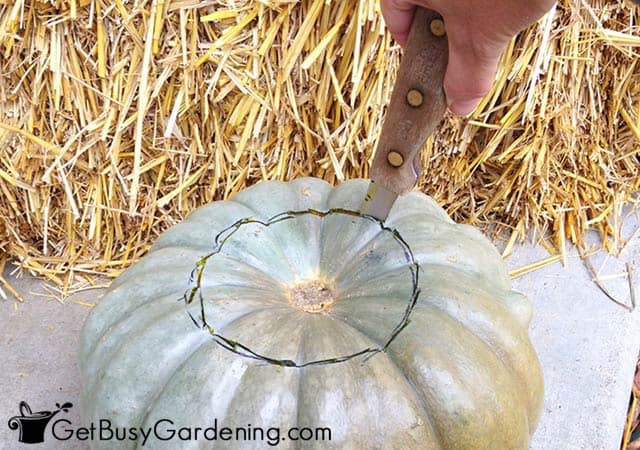
Step 3: Draw a circle on top of the pumpkin – Place the pot upside down on top of the pumpkin, and center it over the stem.
Use a permanent marker to trace a circle around the outside of the pot. This will be the opening where you’ll plant the mum.

Step 4: Cut an opening in the top – Use a sharp knife to cut open the hole you traced in the last step. Follow along the line you drew as well as you can so the circle is nice and even.
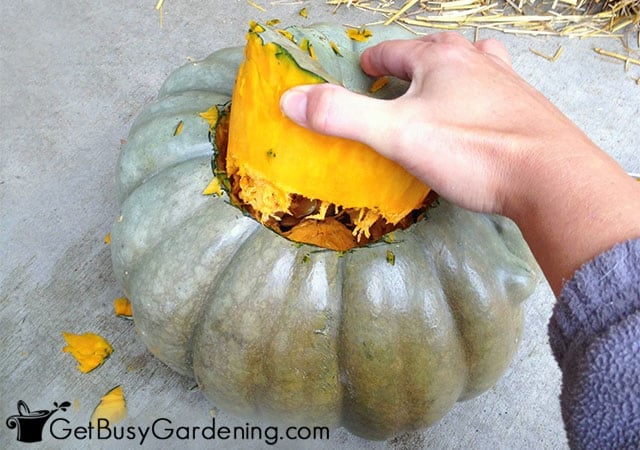
You can cut the top off in sections, if that is easier for you. It doesn’t need to be kept in one piece, since you’ll just be discarding it.
Step 5: Remove the top of the pumpkin – Once you’ve cut the opening, pull out the top, and toss it into the compost bin. If your circle looks choppy, take a little extra time to carve it smoother.
Related Post: How To Preserve A Carved Pumpkin & Tips To Make It Last Longer
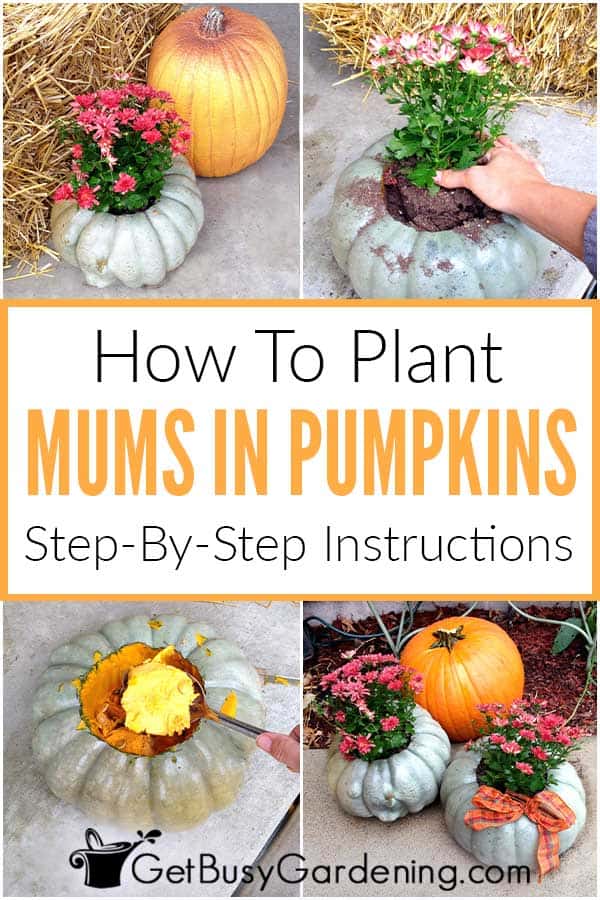
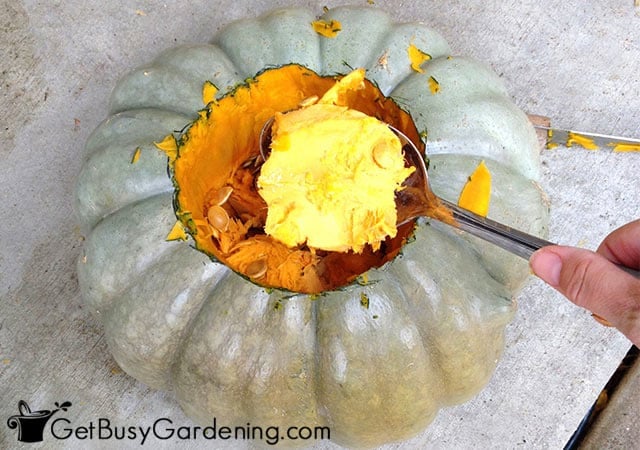
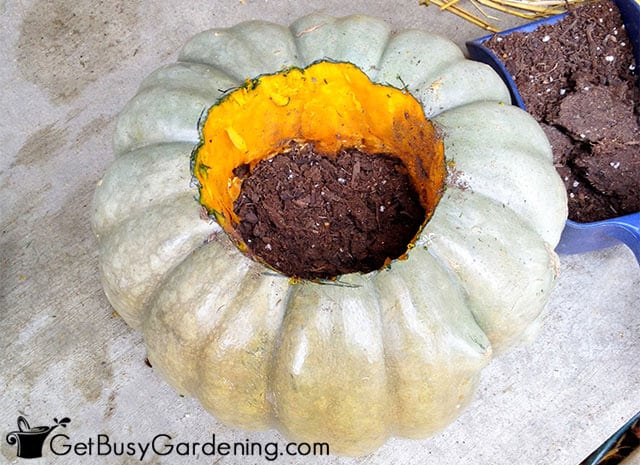
Step 6: Remove the guts and seeds – To make room for the rootball of the mum, you’ll probably need to remove some of the pumpkin guts and seeds.
Simply scoop them out with a large spoon or your hands (you may want to wear disposable gloves if you use your hands).
You don’t need to remove all of the stuff from inside of the pumpkin, just enough to make room for planting the mum. Think of the leftovers as extra fertilizer!
Step 7: Add the soil – Pour enough potting soil into the bottom of the pumpkin so that the top of the mums rootball sits a half to one inch below the opening that you cut.
Leaving a nice amount of headspace will prevent the dirt from running down the sides of the planter when you water the mum.
Step 8: Plant a mum in the pumpkin – Plant the mum in your pumpkin flower pot just as you would in any other container.
Gently press the soil around the rootball as necessary to fill the planting hole completely.
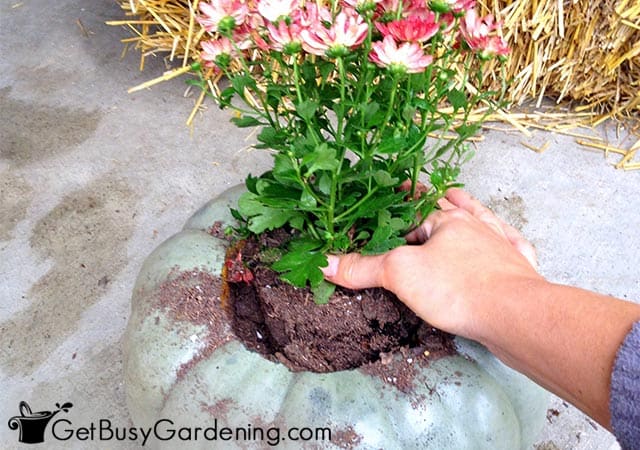
Step 9: Water the chrysanthemum – Once the mum is planted in the pumpkin, water it to allow the potting soil to settle. Backfill any large holes or gaps with more soil, if necessary.
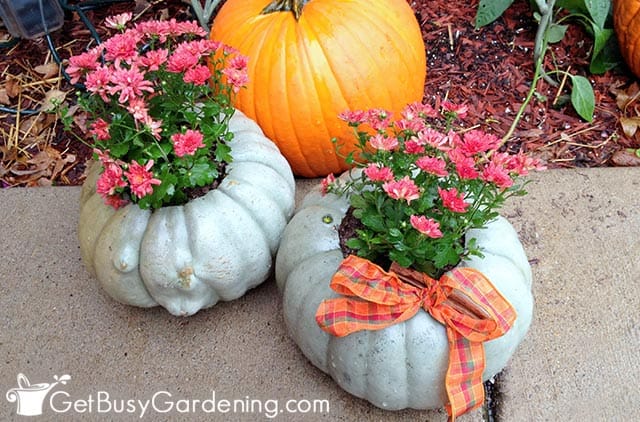
Step 10: Decorate it (optional) – You can leave your pumpkin pot for mums as is, or dress it up. Try adding a decorative bow like I did, or some fun fall garland.
If you want to create a spooky Halloween vibe, add fake webbing and a plastic spider. Or stick a Thanksgiving pick in it to make it festive for that holiday.
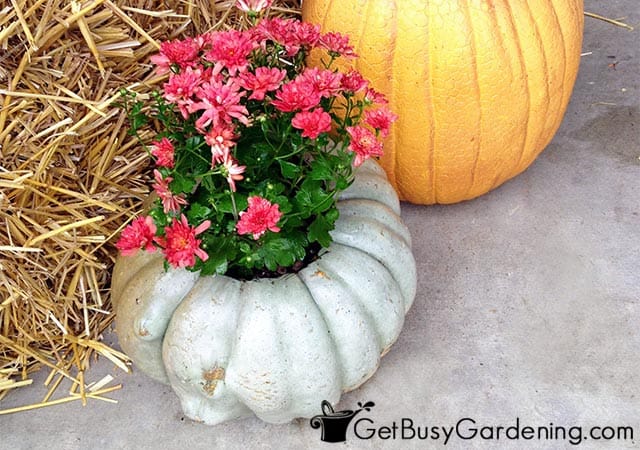
Planting a mum in a pumpkin is easy, and a very quick little fall project. The best part is that once the chrysanthemums are done blooming, you can toss the whole pumpkin planter into the compost bin.
More Fun DIY Projects
- How To Make An Easy DIY Tiered Planter
- How To Paint Terracotta Pots Step-By-Step
- How To Make An Indoor Succulent Garden
- How To Make A Cheap DIY Compost Bin
- How To Make DIY Scented Pine Cones
What’s your favorite way to use mums and pumpkins to decorate for fall?
Print This Easy Mums In Pumpkin Project
Planting Mums In Pumpkins
Planting a mum in a pumpkin is an easy, quick, and inexpensive project. Use these adorable planters to decorate your porch and yard for fall. Or bring them inside to use as centerpieces for your Halloween and Thanksgiving parties.
Materials
- A mum plant of your choosing
- A pumpkin or gourd that's large enough to hold the mum
- Sharpie marker
- General potting soil
- Disposable gloves (optional)
- Fall colors ribbon (optional)
Tools
- Sharp knife
- Large spoon (optional)
Instructions
- Select your pumpkin and mum combo – There aren’t many rules to follow here, you can let your creativity run wild. Choose colors that clash, or ones that compliment each other, it’s totally up to you! But, do make sure your mums and pumpkins are proportionate in size. If one is much larger or smaller than the other, it won’t look very good.
- Remove the mum from its pot – Gently remove the plant from the container it came in. You’ll need the pot for the next step, but set the mum aside for now.
- Draw a circle on top of the pumpkin – Place the pot upside down on top of the pumpkin, centered over the stem. Use a permanent marker or to trace a circle around the outside of the pot. This will be the opening where you’ll plant the mum.
- Cut an opening in the top of the pumpkin – Use a sharp knife to cut open the hole you traced in the last step. Follow along the line you drew as well as you can so the circle is nice and even. You can cut the top off in sections, if that is easier for you. It doesn’t need to be kept in one piece, since you’ll just be discarding it.
- Remove the top of the pumpkin – Once you’ve cut the opening, pull out the top, and toss it into the compost bin. If your circle looks choppy, take a little extra time to carve it smoother.
- Remove the guts and seeds – To make room for the rootball of the mum, you’ll probably need to remove some of the pumpkin guts and seeds. Simply scoop them out with a large spoon or your hands (you may want to wear disposable gloves if you use your hands). You don’t need to remove all of the stuff from inside of the pumpkin, just enough to make room for planting the mum. Think of the leftovers as extra fertilizer!
- Add potting soil – Pour enough potting soil into the bottom of the pumpkin so that the top of the mums rootball sits a half to one inch below the opening that you cut. Leaving a nice amount of headspace will prevent the dirt from running down the sides of the pumpkin when you water the mum.
- Plant the mum in the pumpkin – Plant the mum in your pumpkin flower pot just as you would in any other container. Gently press the potting soil around the rootball as necessary to fill the planting hole completely.
- Water the chrysanthemum – Once the mum is planted in the pumpkin, water it to allow the potting soil to settle. Backfill any large holes or gaps with more soil, if necessary.
- Decorate it (optional) – You can leave your pumpkin planter as is, or dress it up. Try adding a decorative bow like I did, or some fall garland.

Kim g says
My pumpkin grew mold on the outside after only a week! Too much water?
Amy Andrychowicz says
Bummer that your carved pumpkin molded so quickly! Yes, too much water/humidity will cause them to mold much faster.
Kelly says
About how long will they last before the pumpkin rots?
Amy Andrychowicz says
It depends on how humid it is where you live, and how wet the soil is. I keep mine outside, so the freezing temperatures kill them before the pumpkin ever rots here in MN. 🙂 But, if you live somewhere warmer, then I would suspect it would take a month or so before the pumpkin starts to rot. It will rot faster in humid climates, and much slower in dry climates.
Barbara fell says
Hi amy, really unique
idea with the pumkin, absolutely love it, x
Amy Andrychowicz says
Glad you like it Barbara! Have fun making your own! 🙂
Amy
Sarah @ SarahTitus.com says
Oh wow, this is simply amazing. What a great idea. The pumpkin will not rot the flower? Genius idea! Your site is fantastic. Pinning this right now! 🙂
Amy Andrychowicz says
Thanks, I’m glad you like it! Eventually the pumpkin will start to rot. But the mum is just a short lived decorative flower. So, by the time it’s done blooming, the whole planter can go right into the compost bin.
Sugar says
That pumpkin and mum planter is adorable!
Amy Andrychowicz says
Thanks!